Hosting a static site on an original Raspberry Pi
Jun 15, 2025 - ⧖ 8 minIt's been a while (4ish years...) since I last posted to this blog, but I'm making another attempt at getting back in the habit of sharing my mad side-quests in a format people might find useful. Here we go!
For a long time, I've had a strange obsession with making use of the worst possible hardware to do "stuff". This is despite having a collection of semi-decent random computers sat around doing nothing.
Thanks to my friend Phill, who does not share the same hoarding tendencies as myself, I also have a collection of first generation Raspberry Pis. Two of these are super early ones from 2011 with 256MB RAM. Naturally I decided that the best way to resurrect this blog would be to move to from GitHub Pages to one of these boards.
I have attempted to make use of these boards in the past, but the limiting factor always ends up being storage. They are only capable of booting from an SD Card and your average Linux-based workload both runs like treacle and eventually kills this very sub-optimal storage medium.
The solution to this is Alpine Linux "diskless" mode; this runs the whole OS, applications and any configuration you need to persist from RAM! Yes, I only have 256MB of RAM to work with but at least whatever I can fit into this space won't be bottlenecked by terrible storage performance.
Setting up the SD Card
Alpine Linux has some great documentation on how to install on a Raspberry Pi, and are one of the few distros still supporting the 32bit ARMv6 processor in these old Pis. However I will document the process I followed here, because I did hit a number of issues.
The first issue, was that the Raspberry Pi Imager route creates an absolutely tiny partition which seem to use FAT16. A bug in dosfstools means I found no way to increase this to a workable size under Linux. So I followed the "Manual method" mentioned on the wiki page.
With the SD card still connected to my laptop I then completely ignored the note at the top of config.txt and changed the contents to the following. This is because certain settings such as gpu_mem=16 do not work if placed in usercfg.txt and I thought I'd just make all my changes in the same place.
The most important change here is reducing the amount of memory allocated to the GPU to maximise the amount of RAM available for activities; without this change I could not get the Alpine Linux installation script to complete. I have also overclocked the snot out of the CPU (your mileage may vary) which is somehow completely stable without so much as a heatsink and running at just over 50C under load.
# do not modify this file as it will be overwritten on upgrade.
# create and/or modify usercfg.txt instead.
# https://www.raspberrypi.com/documentation/computers/config_txt.html

kernel=boot/vmlinuz-rpi
initramfs boot/initramfs-rpi
arm_64bit=0
gpu_mem=16
arm_freq=1100
core_freq=500
sdram_freq=500
over_voltage=8
include usercfg.txt
Before you unmount your SD Card you need to grab fixup4cd.dat, fixup_cd.dat, start_cd.elf and start4cd.elf from github.com/raspberrypi/firmware and place them alongside the rest of the firmware files. These are the cut down firmware files which get used when you set gpu_mem=16 and are not shipped by Alpine Linux by default. I think you might be able to go without the "4" ones as I suspect they are for the Pi 4/5 but I copied them anyway.
The Install Process
The Pi should boot to the SD Card pretty quickly with a keyboard, monitor and network cable attached. However you might see some harmless clock-related error messages. You can login as root with no password and run setup-alpine to begin the installation. Documentation for Diskless Mode is available on the wiki but here are the rough steps I followed:
- Set up networking, root password, timezone and no network proxy as you might expect
- Chose the default of Busybox for NTP
- Ignore the errors about SSL (probably clock related again) for the APK mirror and just chose the defaults and use their CDN
- I didn't bother setting up a non-root user
- I chose the default of OpenSSH and changed the default of
prohibit-passwordfor root login toyesso I could easily SSH in later and skipped typing in my SSH key - For the disk settings I declined to try the boot media, selected "none" for a config store and "none" for an apk cache.
After connecting over SSH I then ran setup-lbu mmcblk0p1, mount -o remount,rw /dev/mmcblk0p1 and mkdir /media/mmcblk0p1/cache to set up the SD Card for diskless operation.
Then I fixed my SSH security sins like this:
mkdir .ssh
vi .ssh/authorized_keys # Pasting my public key
chmod 600 .ssh/authorized_keys
vi /etc/ssh/sshd_config # Comment out my change to the default of `PermitRootLogin`
Now to have any of these changes persist after reboot it necessary to get familiar with the lbu tool. If you are familiar with git it won't feel completely foreign.
First I ran lbu status and/or lbu diff to see any changes that have not yet been committed. Then lbu add /root/.ssh/authorized_keys to have the tool track the state of my new additional file (this must be the absolute not relative path) and lbu commit -d to save the changes.
You can now reboot the system and hopefully pick up where you left off.
Configuring Lighttpd
There are many webservers available in the Alpine Linux package repositories, including ones like Nginx and Caddy which I have used extensively in the past. However this project isn't about doing things the normal way, it's about making use of the worst hardware possible and trying to get decent performance; so I did an apk add lighttpd.
The docs for Lighttpd on the Alpine wiki are great so you can follow them to configure it to run on boot with rc-update add lighttpd default and start it up with rc-service lighttpd restart. You can then stick your static site /var/www/localhost/htdocs/ and be off to the races.
Unfortunately if you expect this to work after an lbu commit -d and a reboot I'm afraid you will be out of luck. I discovered the /var/lib/lighttpd and /var/log/lighttpd did not get created on boot, and unless you want to tell lbu to keep track of all your log and cache files (don't do this...) there isn't out out-of-the-box way to fix this. Depending on how big your static site is, you might want to lbu add /var/www/localhost/htdocs though.
What I did was put a script in /etc/local.d/lighttpd-log.start and chmod +x it:
mkdir /var/log/lighttpd
mkdir /var/lib/lighttpd
chown lighttpd:lighttpd /var/log/lighttpd
chown lighttpd:lighttpd /var/lib/lighttpd
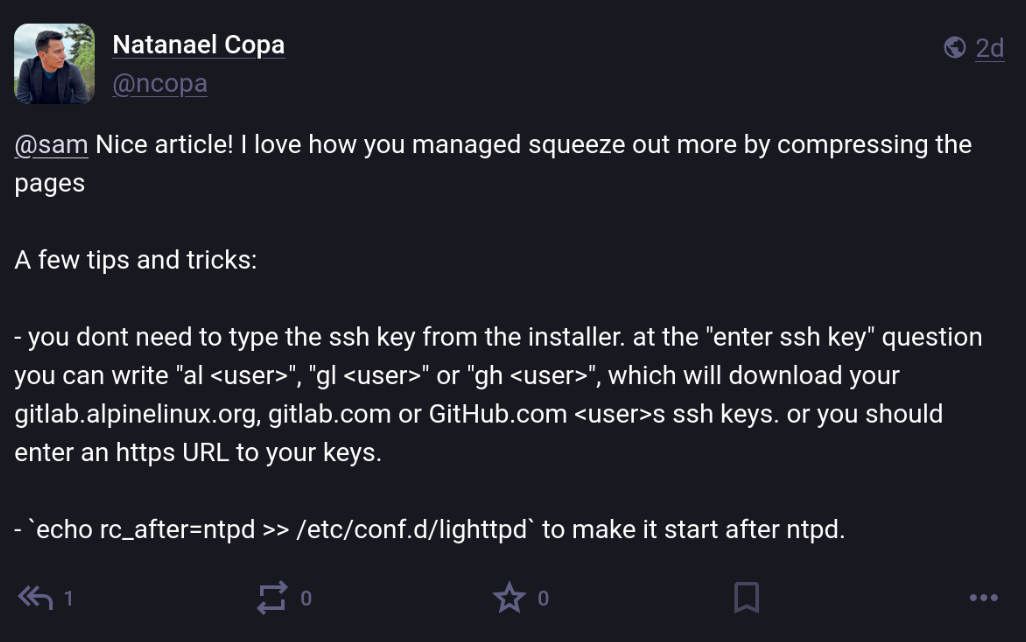
I am still struggling with lighttpd crashing out when it detects the clock jumping forward multiple years on boot (hardware clockless SBC owner problems), so my current solution is to ignore the problem and run Natanael Copa shared how you can tell lighttpd to start after ntpd:rc-service lighttpd restart by hand every time I reboot.
echo rc_after=ntpd >> /etc/conf.d/lighttpd
Benchmark time!
Out of curiosity I spun up Locust to see what kind of performance my new fancy ramdisk-based web server could do. The static site for testing purposes is a 17KB HTML file with an ASCII art bottle of mayonnaise (https://lube.pizza). With the default 700MHz clock speed I got around 350 requests per second, which I thought was pretty good.
After overclocking the snot out of it (see config.txt at the top of this blog) I plateaued at just over 500 requests per second, but noticed that the CPU didn't seem to be working that hard.
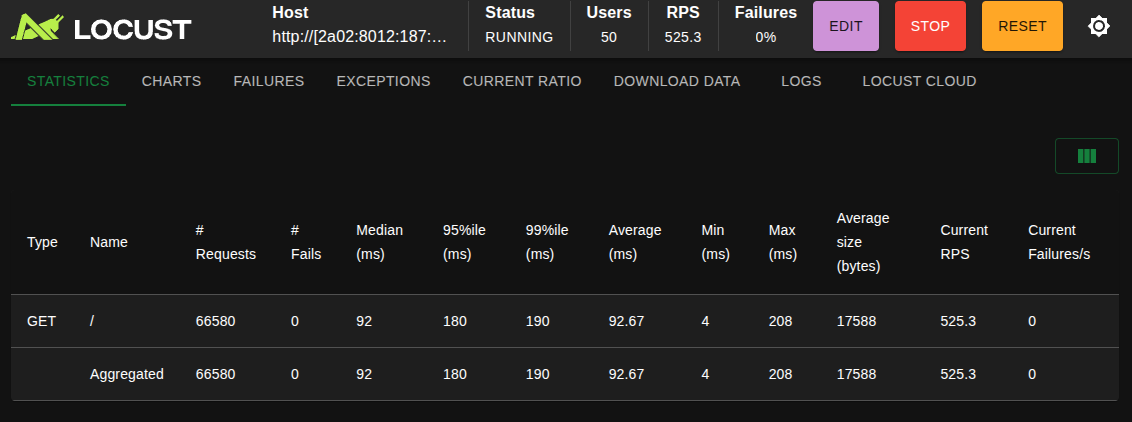
At this point I had a brainwave; these old Pis only have a 100Mb NIC which I was completely saturating! What if I enable HTTP compression in Lighttpd to shrink down the response size?
To do this I just edited /etc/lighttpd.conf, uncommented mod_deflate in the server.modules section at the top of the file and the two default configuration lines in the mod_deflate section further down the file.
The result was 1100 requests per second! Out of a 1st gen Pi this is downright ridiculous. Admittedly the workload is an absolute best case scenario, but it does show what is possible with the right software choices on very limited hardware.

I have lost the screenshot, but after using acme.sh installed with the Alpine Linux package to get a TLS certificate the server still managed over 600rps over HTTPS. I will detail that setup in a future blog.
Thanks for reading!
If you got this far, well done; you have endured my ramblings for a significant period of time. You are reading this blog on the very Raspberry Pi described in this article via the Marmite static site generator.
Sorry if you are following along with this post and find errors or omissions. The blog source is on GitHub for you to open an Issue or Pull Request with any corrections.
You can also complain to me on the Fediverse/Mastodon at @sam@cablespaghetti.dev. The snac instance hosting this profile also runs on the very same Pi in this article. Watch this space for a blog on that journey.
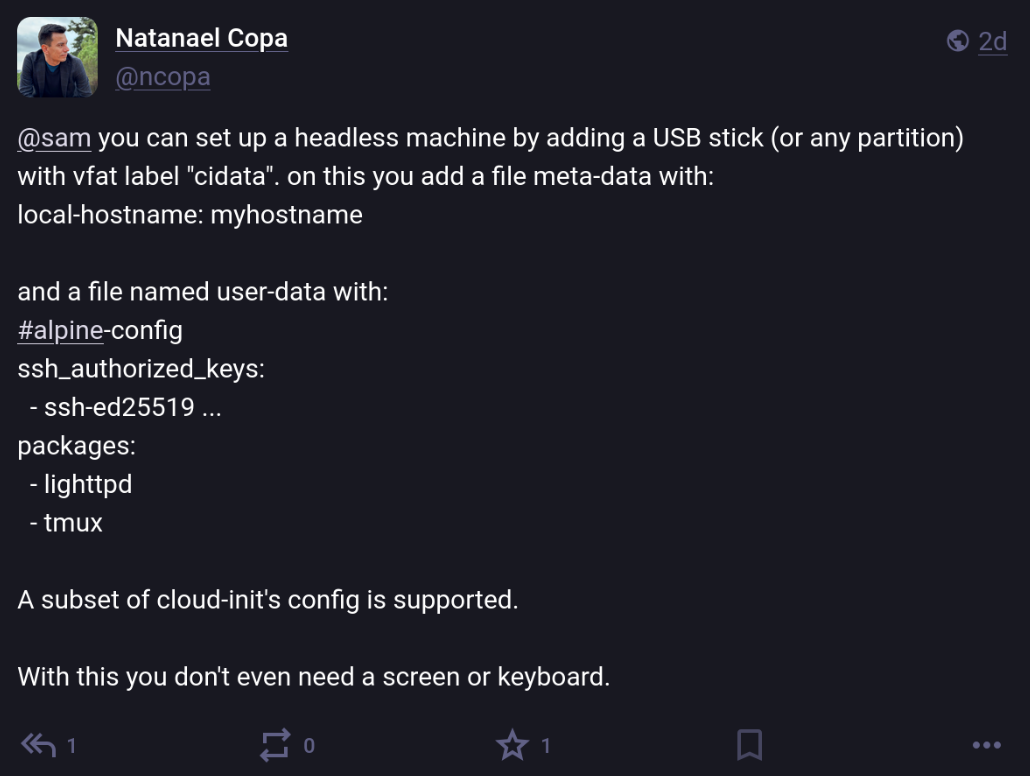
Bonus Bit: Service Ordering
Natanael Copa founder of Alpine Linux replied to my fediverse post and shared these nuggets of wisdom.