Hosting a Fediverse instance on an original Raspberry Pi
Jun 19, 2025 - ⧖ 7 minIn my previous post, I moved my blog to the original 256MB RAM Raspberry Pi that I purchased for the princely sum of £25 in May 2012. When I'd finished that little project I couldn't help but notice that due to not being a particularly successful blogger, I still had a lot of resources to spare.
I had heard of snac from following Justine Smithies who hosts her Fediverse presence on it. I knew it was stupidly lightweight, even more so than GoToSocial and quickly discovered that some helpful individual has even packaged it for Alpine Linux with armhf/armv6 builds available!
Whilst I do like snac and am currently using it as primary fedi instance in place of Mastodon, I will preface this with the warning that it is very minimal, and definitely aimed at unixy sysadmin types. Do not expect the full feature set that you get with Mastodon, and compatibility with Mastodon apps is patchy at best in my experience (although I have got Mona for iOS to work quite well).
Installation
As snac is still under heavy development, I wanted the newest possible version, so whilst I am running the latest stable Alpine Linux, I wanted the version of snac from the "edge" repository. To achieve this I just pointed /etc/apk/repositories at the edge version of the community repository:
/media/mmcblk0p1/apks
http://dl-cdn.alpinelinux.org/alpine/v3.22/main
http://dl-cdn.alpinelinux.org/alpine/edge/community
Then it's as simple as apk add snac. I also ran rc-status add snac default to make sure it starts up on boot.
Storage
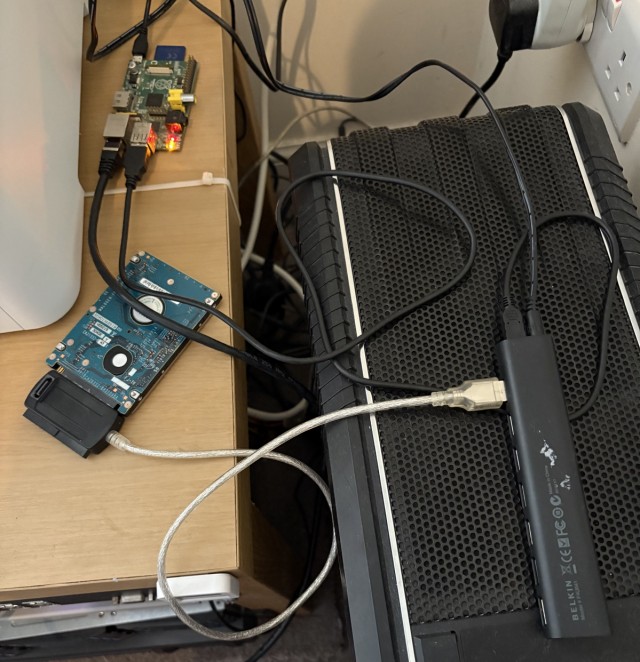
"But Sam!" I hear you say, "The photo at the top of the post shows a 2.5" hard disk!"
Yes, well spotted. Lightweight or not, I don't want to store all my snac data on an SD Card. So consistent with the theme of this series, I found the oldest and slowest 2.5" hard disk (an IDE 40GB Fujitsu from 2004), random USB adapter and a powered USB 2.0 hub to connect up to my terrible server.
Note: I have since switched to btrfs as it seems to have lower memory usage. Snapshots are also a bonus for backups.
When connected it showed up in dmesg as /dev/sda, so I ran apk add xfsprogs to get the XFS utilities, used fdisk /dev/sda to make a new MBR partition table and single "Linux" (the default) type partition on it and mkfs.xfs /dev/sda1 to format the partition.
Amazingly considering the age of the drive and the amount of time it has been sat in my pile of mostly dead hard drives, this all worked properly and I could mount -t xfs /dev/sda1 /var/lib/snac. I then added this line to /etc/fstab so it would mount on boot:
/dev/sda1 /var/lib/snac xfs defaults 0 2
I also ran chown snac:snac /var/lib/snac to make sure the snac user can write to it.
We'll get to backups later; because you are definitely going to want backups with a setup like this...
Now might be a good time to lbu commit -d to save your changes in case of screw ups.
Snac configuration
It was at this point at the snac System Manager's Manual became very useful. Usually you would have the man pages available locally, but I don't...because lightweight...
For the Alpine package the snac init script mentioned in the above documentation is automatically triggered when you run rc-service snac start. Please read the docs linked above, but my answers looked like this:
Network address or full path to unix socket [127.0.0.1]:
Network port [8001]:
Host name: cablespaghetti.dev
URL prefix: /fedi
Admin email address (optional): myemail@example.com
As you can see I used the defaults for the networking stuff, gave it my domain name and told it that snac is going to live at /fedi because this blog lives at the root. It then started up and everything was rosy. However both snac and lighttpd (spoilers...) support unix domain sockets, which in theory have less overhead, so I plan to play with that option at some stage.
You can edit the other settings such as the server description in /var/lib/snac/data/server.json and then run rc-service snac restart.
You'll want to add your user at this point, which I did by running su -s /bin/sh - snac to get a shell as the snac user, then snac adduser /var/lib/snac/data.
Reverse Proxy Configuration
I've got a lot of little tweaks and hacks in my config which aren't really relevant to this post, so I'll just mention the important bits you need to change from the default Alpine lighttpd.conf to get this working.
First of all in /etc/lighttpd/lighttpd.conf I uncommented mod_proxy and mod_openssl in addition to the mod_deflate I mentioned in my previous post.
Getting a TLS Certificate
I've previously used certbot for getting TLS certificates (when not using Kubernetes of course). However it is a Python application and I immediately ran out of ramdisk when I tried to install it. I then went searching on pkgs.alpinelinux.org and discovered acme.sh. You know the drill by now apk acme.sh.
I'm assuming that you read my previous post and you have a DNS record for your domain pointing at your Raspberry Pi and port 80 is open to the internet...if not...do that...
Now run:
acme.sh --issue -d example.com -w /var/www/localhost/htdocs
That will get you a cert from ZeroSSL, but there are flags if you would rather use a different CA. It's great that there are a bunch of options in this market now...I remember when it was just StartCom.
Hopefully that worked and you can install the cert into the Lighttpd directory.
acme.sh --install-cert -d example.com \
    --key-file       /etc/lighttpd/server.key  \
    --fullchain-file /etc/lighttpd/server.pem \
    --reloadcmd     "rc-service lighttpd reload"
I also set up a cron job to try and renew the cert. In /etc/periodic/daily/acme.sh I put:
#!/bin/sh
acme.sh --cron >>/var/log/acme.log 2>&1
and then chmod +x it.
Now add this snippet to your lighttpd.conf:
ssl.privkey              = "/etc/lighttpd/server.key"
ssl.pemfile              = "/etc/lighttpd/server.pem"
ssl.openssl.ssl-conf-cmd = ("MinProtocol" => "TLSv1.2")
ssl.openssl.ssl-conf-cmd += ("Options" => "-ServerPreference")
$SERVER["socket"] ==     ":443" {
  ssl.engine    = "enable"
}
For bonus points uncomment mod_setenv and enable HSTS but please read up on what you are about to do first:
setenv.add-response-header = ( "Strict-Transport-Security" => "max-age=15768000; includeSubdomains" )
The reverse proxy bit
Setting up a reverse proxy in Lighttpd is stupidly easy. This is my slightly dodgy regex to only proxy the relevant paths to the snac server:
$HTTP["url"] =~ "^/(fedi|.well-known/(webfinger|nodeinfo|host-meta)$|api|oauth|share|authorize_interaction)" {
    proxy.server = ( "" => ( ( "host" => "127.0.0.1", "port" => "8001" ) ) )
    proxy.forwarded = ( "for"          => 1,
                        "proto"        => 1,
                        "host"         => 1
    )
}
Now don't forget to lbu commit -d!
That's all folks
In theory you can now go to https://example.com/fedi and login to your new shiny snac instance. I have about 700 followers and it isn't exactly fast (I mean what do you expect) but it works and is currently doing the job I need it to do.
If you're mad enough to follow this guide a something doesn't work, the blog source is on GitHub for you to open an Issue or Pull Request with any corrections.
You can also complain to me on the Fediverse/Mastodon at @sam@cablespaghetti.dev which will come to this very Raspberry Pi. If I am slow to respond you know why!
Bonus Bit: Backups
I wrote a little backup script which I run as a daily cron job. Currently my instance is very new so it works ok...I'm not 100% sure it'll still work when the data volume grows, but I suppose I'll find out!
It's in this GitHub Gist.